A simple Attribution install
Learn a basic javascript install
To properly install Attribution, you will need to install Attribution code on your website, app, or server. This code will generate messages based on specific triggers you define.
In the simplest implementation, the code can be a snippet of JavaScript that you copy and paste into the HTML of a website to track page views. However, Attribution can also be installed with a combination of apps like Segment, HubSpot, Shopify, Google tag manager or WordPress. Attribution offers a number of integrations for different purposes.
The best way to learn about how Attribution works is to see it in action. This tutorial will take you through a basic client-side install of Attribution app.
Video guide
Before you start
First thing is to consider your funnel or ad pipeline. The pipeline will typically begin with an ad click, then a landing page, then a conversion event. For example:
A. Visitor clicks ad which redirects to www.example.com/fbaid=xyz
B. Visitor lands on www.example.com/fbaid=xyz and submits web form with information
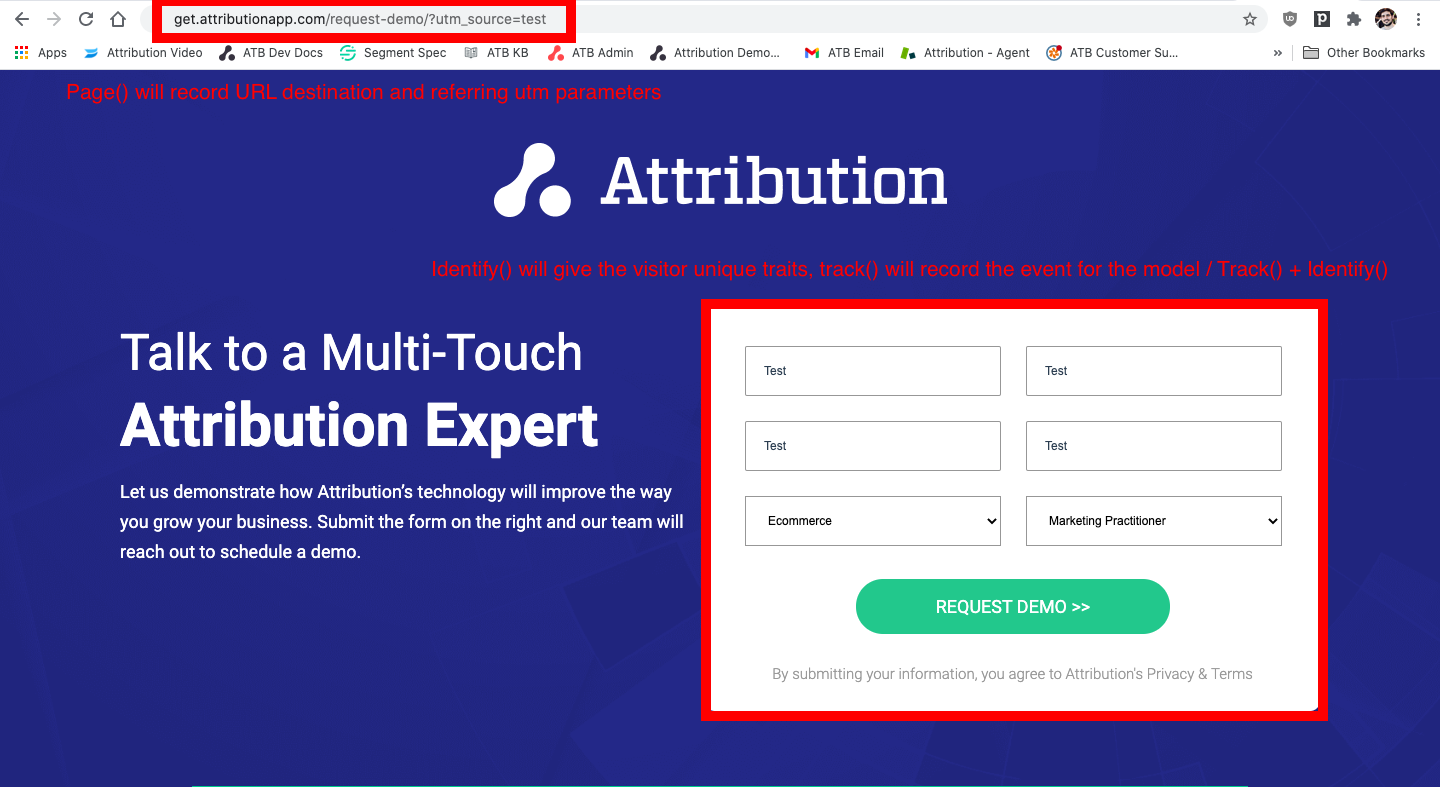
When the snippet is in place and attribution.js properly runs Attribution will use the referring domain and destination domain to provide credit to specific channels & filters on the dashboard. Below you'll learn more about attribution.js and the necessary components for installing Attribution's tracking apparatus.
Find your Attribution Project ID
You can find your project's unique Attribution ID by logging in and going to Settings
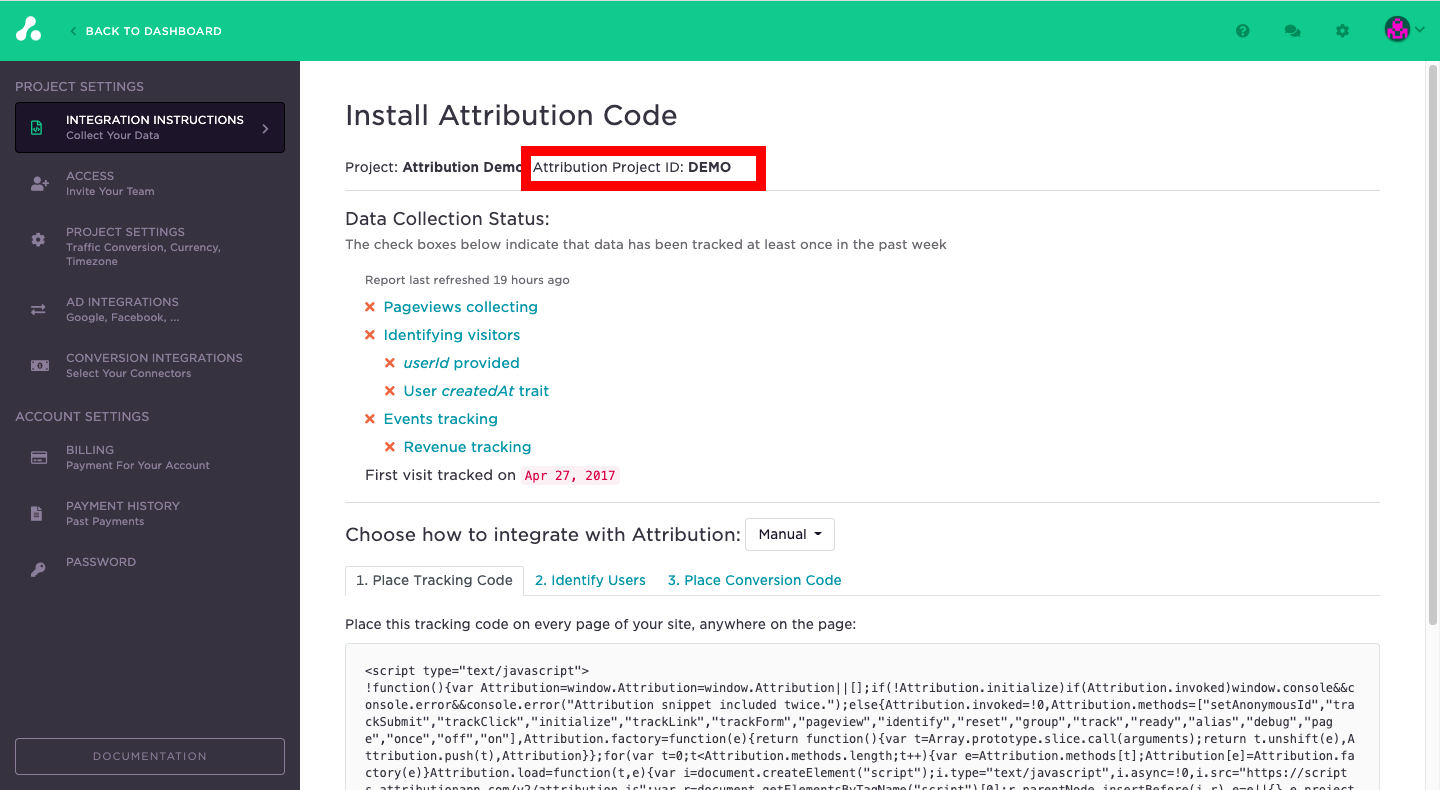
This is your unique project id that will be used with your snippet. Continue below to learn how to install your unique project snippet and start tracking visitors.
Install snippet and call page() to start tracking visits
page() to start tracking visitsCopy your Attribution snippet by going to Settings
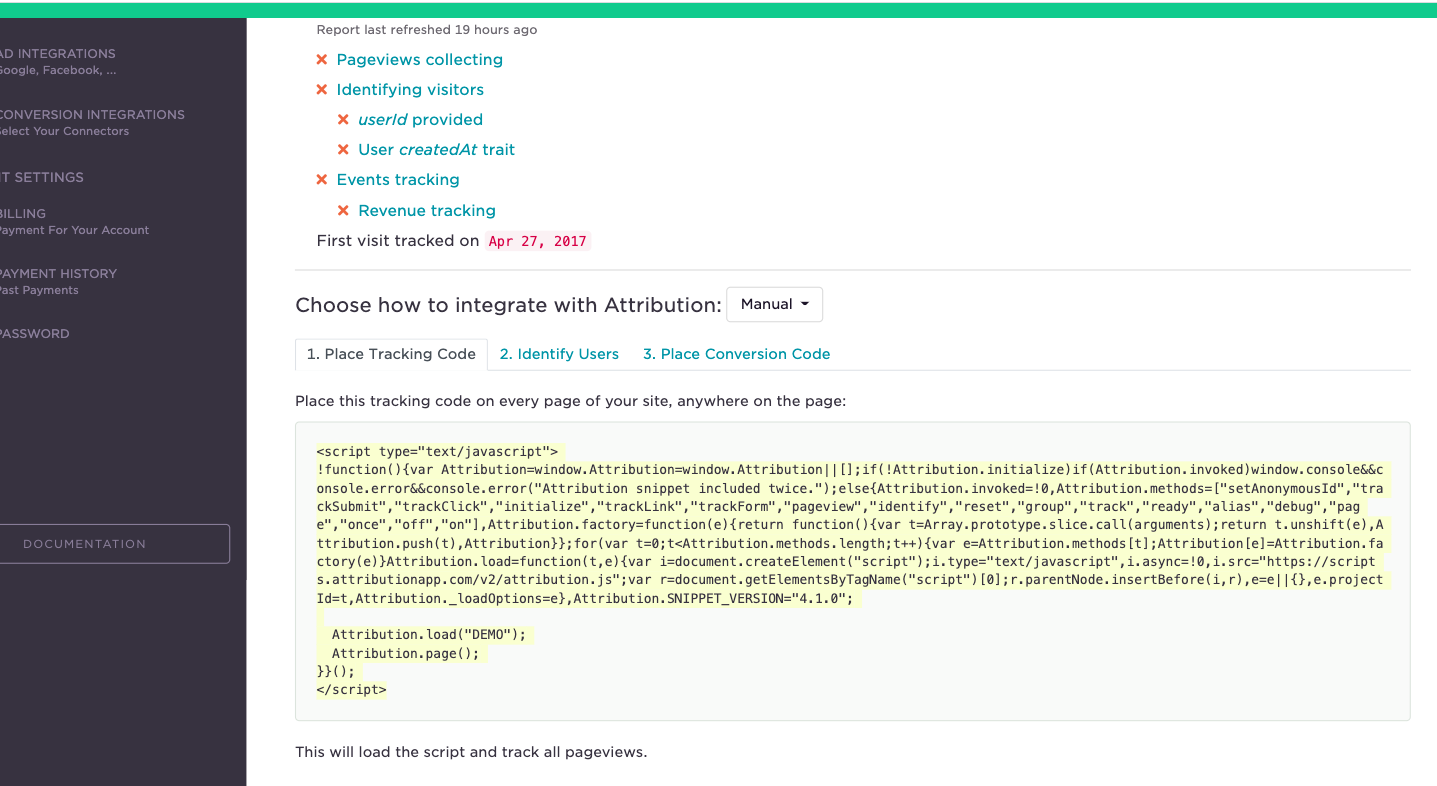
Now paste the snippet from settings into the <head> tag of all your pages. Please note this assumes all your pages are on the same domain. If you'd like to track across multiple domains please be sure to use the cross-domain snippet.
Bundling or Minifying Attribution codeDo not minify or bundle inside a webpack the Attribution JavaScript snippets or it may render unstable in some conditions. Also please try to avoid putting snippets inside a JavaScript enclosures. You are still free to call
track()oridentify()from inside your web app.
Assuming the same domain, the snippet will load attribution.js onto the page asynchronously, so it won’t affect your page load speed. Once the snippet is running on your site you will begin to start recording visits.
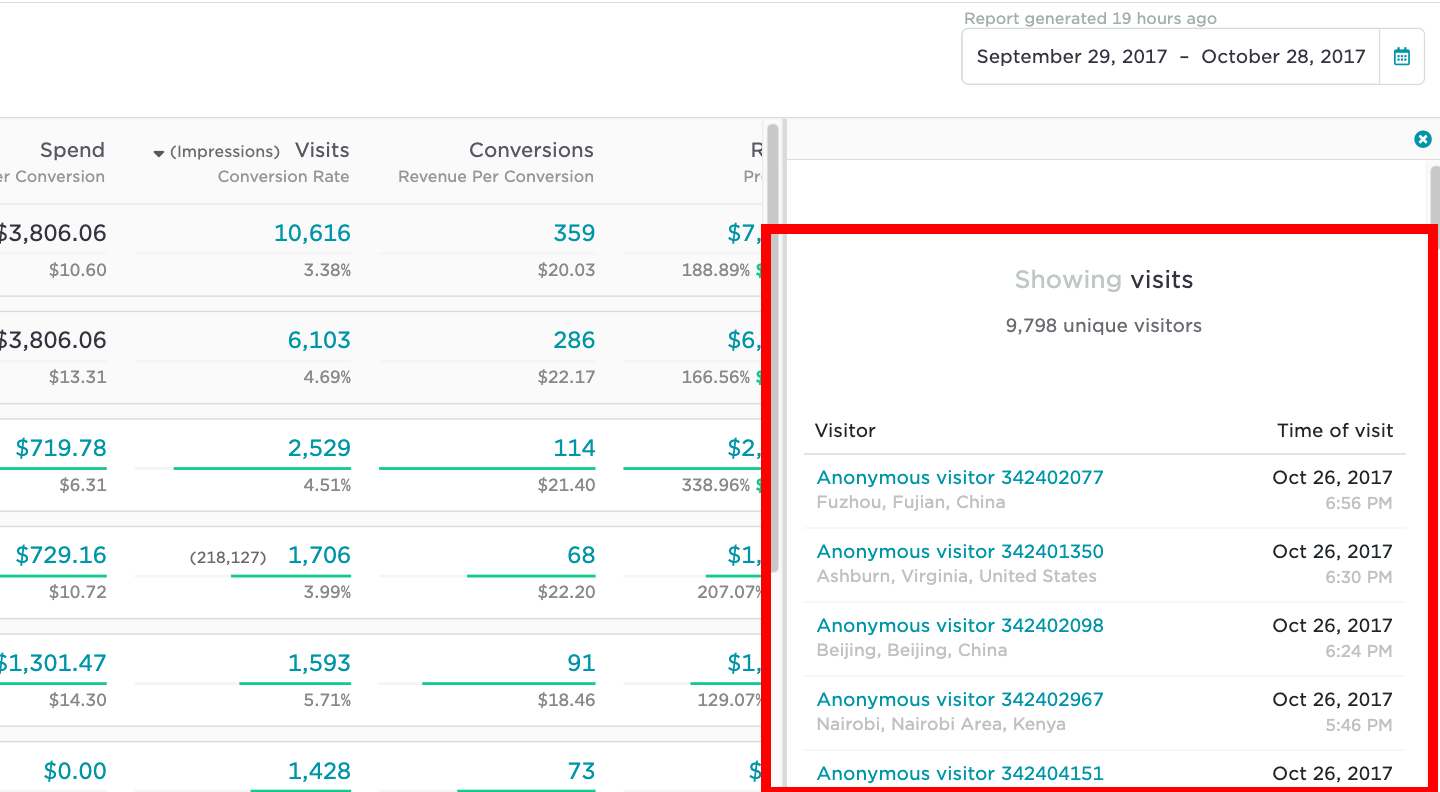
Note: attribution.js will record the referring domain and destination domain of the visit. For example, the referring domain may be www.google.com and the destination domain may be www.attributionapp.com/fbaid=123. Attribution's model will use these values to filter visits on the dashboard and provide credit for ads.
Visitors will appear with anonymous visitor ids in your side bar when you drill into any blue number on the dashboard. Continue reading to learn how to give your visitors traits.
Call identify() for Attribution to know your users
identify() for Attribution to know your usersThe identify() method is how you tell Attribution who the current user is. It includes a unique User ID, and any optional traits you know about them. Calling identify() is not a requirement for installing Attribution, but it is highly highly recommended. It will allow you to easily assign a User ID, name, email to your visitors and it will give you access to features like "disregard existing users" & "company based attribution".
You don't need to call identify for anonymous visitors to your site. Attribution will automatically assign them an anonymousId, so just calling page() and track() works just fine without identify. Identify is high-recommended when you capture any personal information about the visitor also it allows to track visitors across different devices.
Identifying with
If you do not identify visitors before they are submitted or entered into your CRM system or Conversion Integration tool they would likely result events from these integrations to appear in "Unknown Source".
Here’s what a basic call to identify might look like:
Attribution.identify('fbdzldwr', {
  name: 'Konstantin Pats',
  email: '[email protected]'
});
That identifies Konstantin by his unique User ID (in this case, fbdzldwr, which is what you know him by in your database) and labels him with name and email traits.
If you do not have a database you can omit a unique user id and use email trait as user tracking id.
Attribution.identify({
  name: 'Konstantin Pats',
  email: '[email protected]'
});
Please be sure to replace those hard-coded trait values with the variables that represent the details of the currently logged-in user!
To do that, we recommend that you use a backend template to inject an identify call after attribution snippet (into the footer for example) of every page of your site where the user is logged in. That way, no matter what page the user first lands on, they will always be identified.
Depending on your templating language, your actual identify call might look something like this:
Attribution.identify('{{user.id}}', {
  name: '{{user.fullname}}',
  email: '{{user.email}}'
});
With that call in your page footer, you successfully identify every user that visits your site.
Remember - you don’t need to call identify() if you don't know who the visitor is (e.g. User ID and/or email are not available).
You can find more details on calling identify() with OAuth or jQuery here.
Common scenarios when identify() is recommended to be called
identify() is recommended to be called- User signed up on your website - identify with User ID and email,
track()"Signed Up" event - User logged into your website or app - identify with User ID and email.
- Any marketing form submitted - identify with email, track "Form Submitted" event.
- User clicks marketing email and redirected to a landing page - identify if email is available.
- User subscribed to marketing emails - identify with email, track "Subscribed to newsletter" event.
Call track() to record events and build your model
track() to record events and build your modelThe track method is how you give Attribution a conversion event to measure return against. You can record specific conversion events like, 'trial started' or ' demo request' to measure the effectiveness of your ads on specific pipeline points; as well as revenue conversion events like 'order paid', 'subscription payment' or 'completed order' to record revenue in your model.
Here’s what a call to track might look like when a user starts a trial:
Attribution.track('Trial Started', {
  plan: 'Blue'
});
That’s just telling Attribution that your visitor just triggered the Trial Started event and chose your hypothetical 'Blue' plan.
In Attribution you'll be able to filter your conversion events by these properties. For example you can see return on ad spend for your Facebook ads on users that had a Trial Started event specifically for the blue plan.
Tracking conversion events with revenue are unique. Any time a revenue property is present in a track() event it will be considered revenue to be used in calculations and modeling.
In the example below the revenue of 22 would be used in the Attribution model to calculate return on ad spend for your dashboard.
Attribution.track('Order Complete', {
  revenue: '22',
  type: 'blue'
});
If you wanted to deduct revenue in the case of a refund or return you can also call track with a negative revenue. For example, -22 (revenue should always be sent in 00.00 format but cents could be omitted, don't use comma as decimals separator).
To get started, we recommend that you track just a few important events. You can always add more later!
Once you've successfully installed page(), identify(), and track() you have completed the installation of Attribution's tracking requirements and the next steps are connecting ad platforms and filtering visits.
Recapping the install & connecting the dots
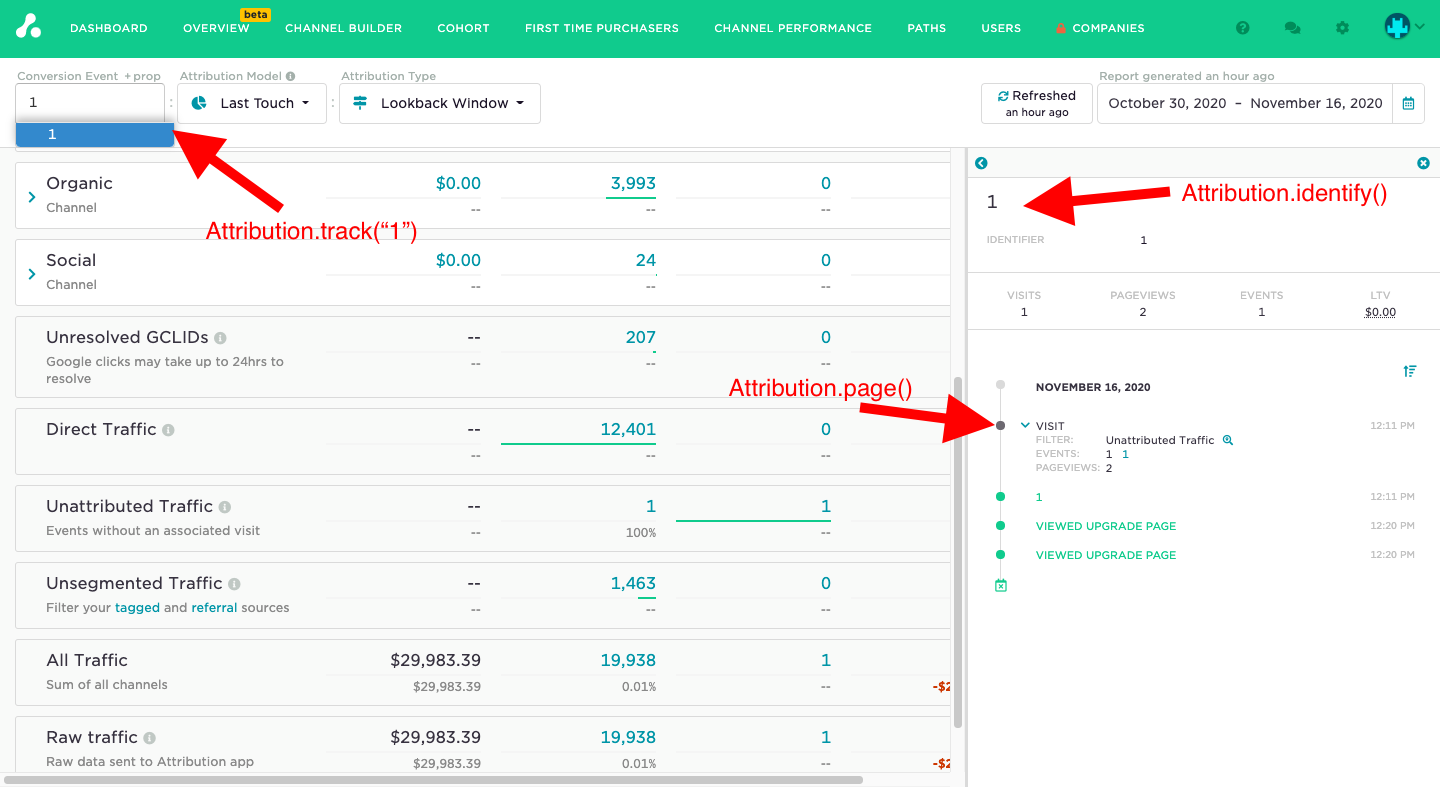
In the example below you can see the visitor's step, what method should be called, and what would appear on the Attribution dashboard if called correctly.
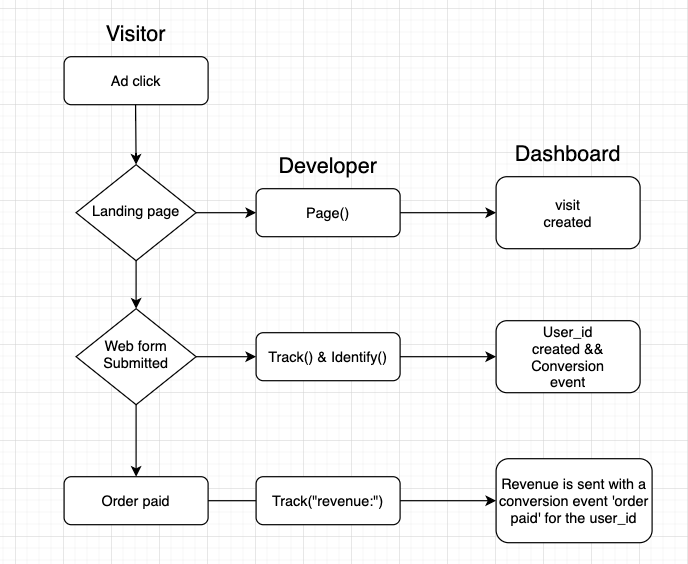
Attribution methods as UI objects on your dashboard.
If you have any questions please reach out to [email protected]
Updated 5 months ago
